これはPGroonga 2.X用のドキュメントです。古いPGroongaを使っているならPGroonga 1.xのドキュメントを見てください。
PGroongaをLaravelと一緒に使う方法
ここではLaravelでPGroongaを使うアプリを一から作っていきます。
インストール
Laravelのインストール
注意: このチュートリアルは既にLaravelとPostgreSQLとPGroongaが使える前提となります。
PHPとComposerがインストール済みの場合は、Composerを使い新規のLaravelプロジェクトを作ります。
composer create-project laravel/laravel pgroonga_laravel
プロジェクト生成後は下記のArtisan CLIコマンドでローカル環境のLaravelが立ち上げ可能です。
cd pgroonga_laravel
php artisan serve
起動後はブラウザでhttp://localhost:8000にアクセスするとこのアプリケーションを使えます。
Laravel Breezeのインストール
次にLaravel Breezeをインストールします。ログインやユーザ登録、パスワードリセットやEmail確認機能、パスワード確認機能を兼ね備えたシンプルな認証パッケージです。TailwindCSSによりデザインされたBladeテンプレートが準備されているためWebページのデザインを素早く作ることができます。
次のコマンドを実行してLaravel Breezeをインストールします。<
composer require laravel/breeze --dev
php artisan breeze:install blade
データベースのセットアップ
Laravel用にPostgreSQLのデータベースを作りましょう。
createdb pgroonga_laravel
LaravelでデフォルトのDBはMySQLですが、PostgreSQLを使うために.envファイルを次のように設定します:
DB_CONNECTION=pgsql
DB_HOST=127.0.0.1
DB_PORT=5432
DB_DATABASE=pgroonga_laravel
DB_USERNAME=postgres
DB_PASSWORD=postgres
DB_USERNAME と DB_PASSWORD は、実際に使っているPostgreSQLのユーザ名とパスワードに変更してください。
ブログの作成
これで新しいアプリを作る準備ができました!このチュートリアルではブログアプリを作ります。サンプルデータを流し込む機能とPGroongaを使った検索機能を実装します。
モデルとマイグレーションとコントローラの作成
ブログを作るためのモデルとマイグレーションとコントローラを作成します。
ブログは記事が必要なのでPostモデルを作ります。モデルを作るためには次のコマンドを実行します。
php artisan make:model -mc Post
このコマンドは次のファイルを生成します。
-
app/Models/Post.php- Eloquentのモデルです。 -
database/migrations/<timestamp>_create_posts_table.php- データベースのテーブルを生成するマイグレーションファイルです。 -
app/Http/Controller/PostController.php- HTTPのリクエストやレスポンスを取り扱うコントローラです。
モデル
Postモデルのapp/Models/Post.phpに検索機能を作りましょう。
元ファイルと変更後のファイルです。
変更前:
<?php

namespace App\Models;

use Illuminate\Database\Eloquent\Factories\HasFactory;
use Illuminate\Database\Eloquent\Model;

class Post extends Model
{
    use HasFactory;
}
変更後:
<?php

namespace App\Models;

use Illuminate\Database\Eloquent\Factories\HasFactory;
use Illuminate\Database\Eloquent\Model;

class Post extends Model
{
    use HasFactory;

    public static function search($keyword)
    {
        if(empty($keyword)){
            return static::query();
        }

        $search_columns = ['title', 'body'];

        $search_query = static::query();

        foreach($search_columns as $column){
            $search_query->orWhereRaw("$column &@~ ?", [$keyword]);
        }

        return $search_query;
    }
}
マイグレーション
Postモデルdatabase/migrations/<timestamp>_create_posts_table.php用のデータベースマイグレーションを作ります。
以下が変更前と変更後の内容です。
変更前:
<?php

use Illuminate\Database\Migrations\Migration;
use Illuminate\Database\Schema\Blueprint;
use Illuminate\Support\Facades\Schema;

return new class extends Migration
{
    /**
     * Run the migrations.
     */
    public function up(): void
    {
        Schema::create('posts', function (Blueprint $table) {
            $table->id();
            $table->timestamps();
        });
    }

    /**
     * Reverse the migrations.
     */
    public function down(): void
    {
        Schema::dropIfExists('posts');
    }
};
変更後:
<?php

use Illuminate\Database\Migrations\Migration;
use Illuminate\Database\Schema\Blueprint;
use Illuminate\Support\Facades\DB;  // ここを忘れずに
use Illuminate\Support\Facades\Schema;

return new class extends Migration
{
    /**
     * Run the migrations.
     */
    public function up(): void
    {
        Schema::create('posts', function (Blueprint $table) {
            $table->id();
            $table->text('title');
            $table->text('body');
            $table->timestamps();
        });

        Schema::table('posts', function (Blueprint $table) {
            DB::statement('CREATE EXTENSION IF NOT EXISTS pgroonga');
            DB::statement('CREATE INDEX pgrn_posts_id_index ON posts USING pgroonga (id)');
            DB::statement('CREATE INDEX pgrn_posts_title_index ON posts USING pgroonga (title)');
            DB::statement('CREATE INDEX pgrn_posts_body_index ON posts USING pgroonga (body)');
        });
    }

    /**
     * Reverse the migrations.
     */
    public function down(): void
    {
        DB::statement('DROP INDEX pgrn_posts_id_index');
        DB::statement('DROP INDEX pgrn_posts_title_index');
        DB::statement('DROP INDEX pgrn_posts_body_index');
        DB::statement('DROP EXTENSION IF EXISTS pgroonga');
        Schema::dropIfExists('posts');
    }
};
コントローラ
リクエストを捌くPostコントローラapp/Http/Controller/PostController.phpを作ります。
変更前:
<?php

namespace App\Http\Controllers;

use Illuminate\Http\Request;

class PostController extends Controller
{
    //
}
変更後:
<?php

namespace App\Http\Controllers;

use Illuminate\Http\Request;
use Illuminate\View\View;

class PostController extends Controller
{
    public function index() : View
    {
        $posts = \App\Models\Post::query()->paginate(10);

        return view('posts.index', compact('posts'));
    }

    public function search(Request $request) : View
    {
        $keyword = $request->input('keyword');

        $posts = \App\Models\Post::search($keyword)->paginate(10)->withQueryString();

        return view('posts.index', compact('posts', 'keyword'));
    }

}
ルート設定
コントローラで取り扱うURLを作成します。
ここでは対応する2つのルートを有効にします。
-
indexルートはブログ記事一覧を表示させます。 -
searchルートはブログ記事を検索するのに利用されます。
routes/web.phpを次のように編集します:
<?php

use App\Http\Controllers\ProfileController;
use Illuminate\Support\Facades\Route;

/*
|--------------------------------------------------------------------------
| Web Routes
|--------------------------------------------------------------------------
|
| Here is where you can register web routes for your application. These
| routes are loaded by the RouteServiceProvider and all of them will
| be assigned to the "web" middleware group. Make something great!
|
*/

/* remove
Route::get('/', function () {
    return view('welcome');
});
*/

Route::get('/',  [\App\Http\Controllers\PostController::class, 'index']) // Add
    ->name('posts.index'); // Add
Route::get('/search',  [\App\Http\Controllers\PostController::class, 'search']) // Add
    ->name('posts.search'); // Add

Route::get('/dashboard', function () {
    return view('dashboard');
})->middleware(['auth', 'verified'])->name('dashboard');

Route::middleware('auth')->group(function () {
    Route::get('/profile', [ProfileController::class, 'edit'])->name('profile.edit');
    Route::patch('/profile', [ProfileController::class, 'update'])->name('profile.update');
    Route::delete('/profile', [ProfileController::class, 'destroy'])->name('profile.destroy');
});

require __DIR__.'/auth.php';
これにより次のルートが作成されます:
| Verb | URI | Action | Route Name |
|---|---|---|---|
| GET | / |
index | posts.index |
| GET | /search |
search | posts.search |
Blade
PostControllerのindexとsearchメソッドから返ってくるデータを表示させるためのView用のBladeファイルを作成します:
最初にBreezeの標準テンプレートである resources/views/layouts/guest.blade.php を次のように修正します。
変更前:
<!-- Line 25 -->
	<div class="w-full sm:max-w-md mt-6 px-6 py-4 bg-white shadow-md overflow-hidden sm:rounded-lg">
		{{ $slot }}
	</div>
変更後:
<!-- Line 25 -->
	<div class="w-full lg:max-w-6xl mt-6 px-6 py-4 bg-white shadow-md overflow-hidden sm:rounded-lg">
	    {{ $slot }}
	</div>
次にブログ記事と検索機能を提供するresources/views/posts/index.blade.phpを作成します:
<x-guest-layout>
    <div class="py-2">
        <div class="max-w-7xl mx-auto sm:px-6 lg:px-8">
            <div class="bg-white overflow-hidden shadow-sm sm:rounded-lg">
                <div class="p-2 bg-white border-b border-gray-200">

                    <div>
                        <div class="flex w-full justify-between items-center sm:mb-2">
                            <h2 class="text-3xl font-extrabold tracking-tight text-gray-900 sm:text-4xl sm:mb-4"><a href="/">PGroonga Laravel</a> </h2>
                        </div>
                        <form action="{{ route('posts.search') }}" method="GET">
                            <div class="flex mb-4 justify-between items-center">
                                <div class="block w-3/4">
                                    <div class="flex flex-col sm:flex-row justify-start items-center pl-2">
                                    <input type="search" name="keyword" class="form-control w-full sm:w-5/6 " type="text" value="@if (isset($keyword)) {{ $keyword }} @endif" placeholder="{{ __('Enter search keyword') }}">
                                    <button class="collapse sm:visible inline-block align-left text-base sm:w-20 rounded-md border border-gray-700 sm:p-2 sm:ml-4" type="submit">{{ __('Search') }}</button>
                                    </div>
                                </div>
                            </div>
                        </form>

                        @if($posts ?? false)
                        <div class="container">
                            <div class="bg-white">
                              <div class="max-w-2xl mx-auto px-4 grid items-center grid-cols-1 gap-y-16 gap-x-8 sm:px-6 lg:max-w-7xl lg:px-8 lg:grid-cols-1">
                                <div>

                                  <dl class="sm:mt-8 grid grid-cols-1 gap-x-6 gap-y-2 grid-cols-1 sm:grid-cols-7 sm:gap-y-2 lg:gap-x-8">
                                    <div class="border-t border-gray-200">
                                      <dt class="text-sm sm:text-base sm:font-medium text-gray-900">
                                              ID
                                      </dt>
                                    </div>

                                    <div class="border-t border-gray-200 sm:col-span-2">
                                      <dt class="text-sm sm:text-base sm:font-medium text-gray-900">
                                        {{ __('Title') }}
                                      </dt>
                                    </div>

                                    <div class="border-t border-gray-200 sm:col-span-4">
                                      <dt class="text-sm sm:text-base font-medium text-gray-900">
                                        {{ __('Body') }}
                                      </dt>
                                    </div>

                                    @foreach($posts as $post)
                                        <div class="border-t border-gray-200 pt-1">
                                            <dd class="sm:mt-2 text-sm text-gray-500">
                                                <span class="block m-1">ID: {{ $post->id }}</span>
                                            </dd>
                                        </div>

                                        <div class="border-t border-gray-200 pt-1 sm:col-span-2">
                                            <dd class="sm:mt-2 text-sm text-gray-500">
                                                <span class="block m-1">{{ $post->title }}</span>
                                            </dd>
                                        </div>

                                        <div class="border-t border-gray-200 pt-1 sm:col-span-4">
                                          <dd class="sm:mt-2 text-sm text-gray-500">
                                              <span class="block m-1 line-break">{{ $post->body }}</span>
                                          </dd>
                                        </div>

                                    @endforeach
                                  </dl>
                                </div>

                                  <div>
                                    {{ $posts->links() }}
                                  </div>

                              </div>
                            </div>
                        </div>
                        @endif

                    </div>

                </div>
            </div>
        </div>
    </div>
</x-guest-layout>
ファクトリー
Postモデル用のダミーデータを生成するファクトリーを作成します。
次のコマンドを実行しdatabase/factories/PostFactory.phpファイルを作成します。
php artisan make:factory PostFactory
Postモデル用のダミーデータを生成するコードを書きます。変更前と変更後になります。
変更前:
<?php

namespace Database\Factories;

use Illuminate\Database\Eloquent\Factories\Factory;

/**
 * @extends \Illuminate\Database\Eloquent\Factories\Factory<\App\Models\Post>
 */
class PostFactory extends Factory
{
    /**
     * Define the model's default state.
     *
     * @return array<string, mixed>
     */
    public function definition(): array
    {
        return [
            //
        ];
    }
}
変更後:
<?php

namespace Database\Factories;

use Illuminate\Database\Eloquent\Factories\Factory;

/**
 * @extends \Illuminate\Database\Eloquent\Factories\Factory<\App\Models\Post>
 */
class PostFactory extends Factory
{
    /**
     * Define the model's default state.
     *
     * @return array<string, mixed>
     */
    public function definition(): array
    {
        return [
            'title' => fake()->realText(20),
            'body' => fake()->realText(200),
        ];
    }
}
データベースデータ流し込み機能(シーダー)
データベースへのデータ流し込み機能(シーダー)に作成したファクトリーを使うように設定します。サンプルブログ記事を20万件程流します:
変更前:
<?php

namespace Database\Seeders;

// use Illuminate\Database\Console\Seeds\WithoutModelEvents;
use Illuminate\Database\Seeder;

class DatabaseSeeder extends Seeder
{
    /**
     * Seed the application's database.
     */
    public function run(): void
    {
        // \App\Models\User::factory(10)->create();

        // \App\Models\User::factory()->create([
        //     'name' => 'Test User',
        //     'email' => 'test@example.com',
        // ]);
    }
}
変更後:
<?php

namespace Database\Seeders;

// use Illuminate\Database\Console\Seeds\WithoutModelEvents;
use Illuminate\Database\Seeder;

class DatabaseSeeder extends Seeder
{
    /**
     * Seed the application's database.
     */
    public function run(): void
    {
        // \App\Models\User::factory(10)->create();

        // \App\Models\User::factory()->create([
        //     'name' => 'Test User',
        //     'email' => 'test@example.com',
        // ]);

        echo "Now you need to wait for few minitues \n";

        for($i =0; $i<2000; $i++)
        {
            \App\Models\Post::factory()->count(100)->create();
        }
    }
}
マイグレーション実行とサンプルデータの流し込み
次のコマンドを実行してPostgreSQLにマイグレーションとサンプルデータの流し込みを行います。
php arrtisan migrate
php artisan db:seed
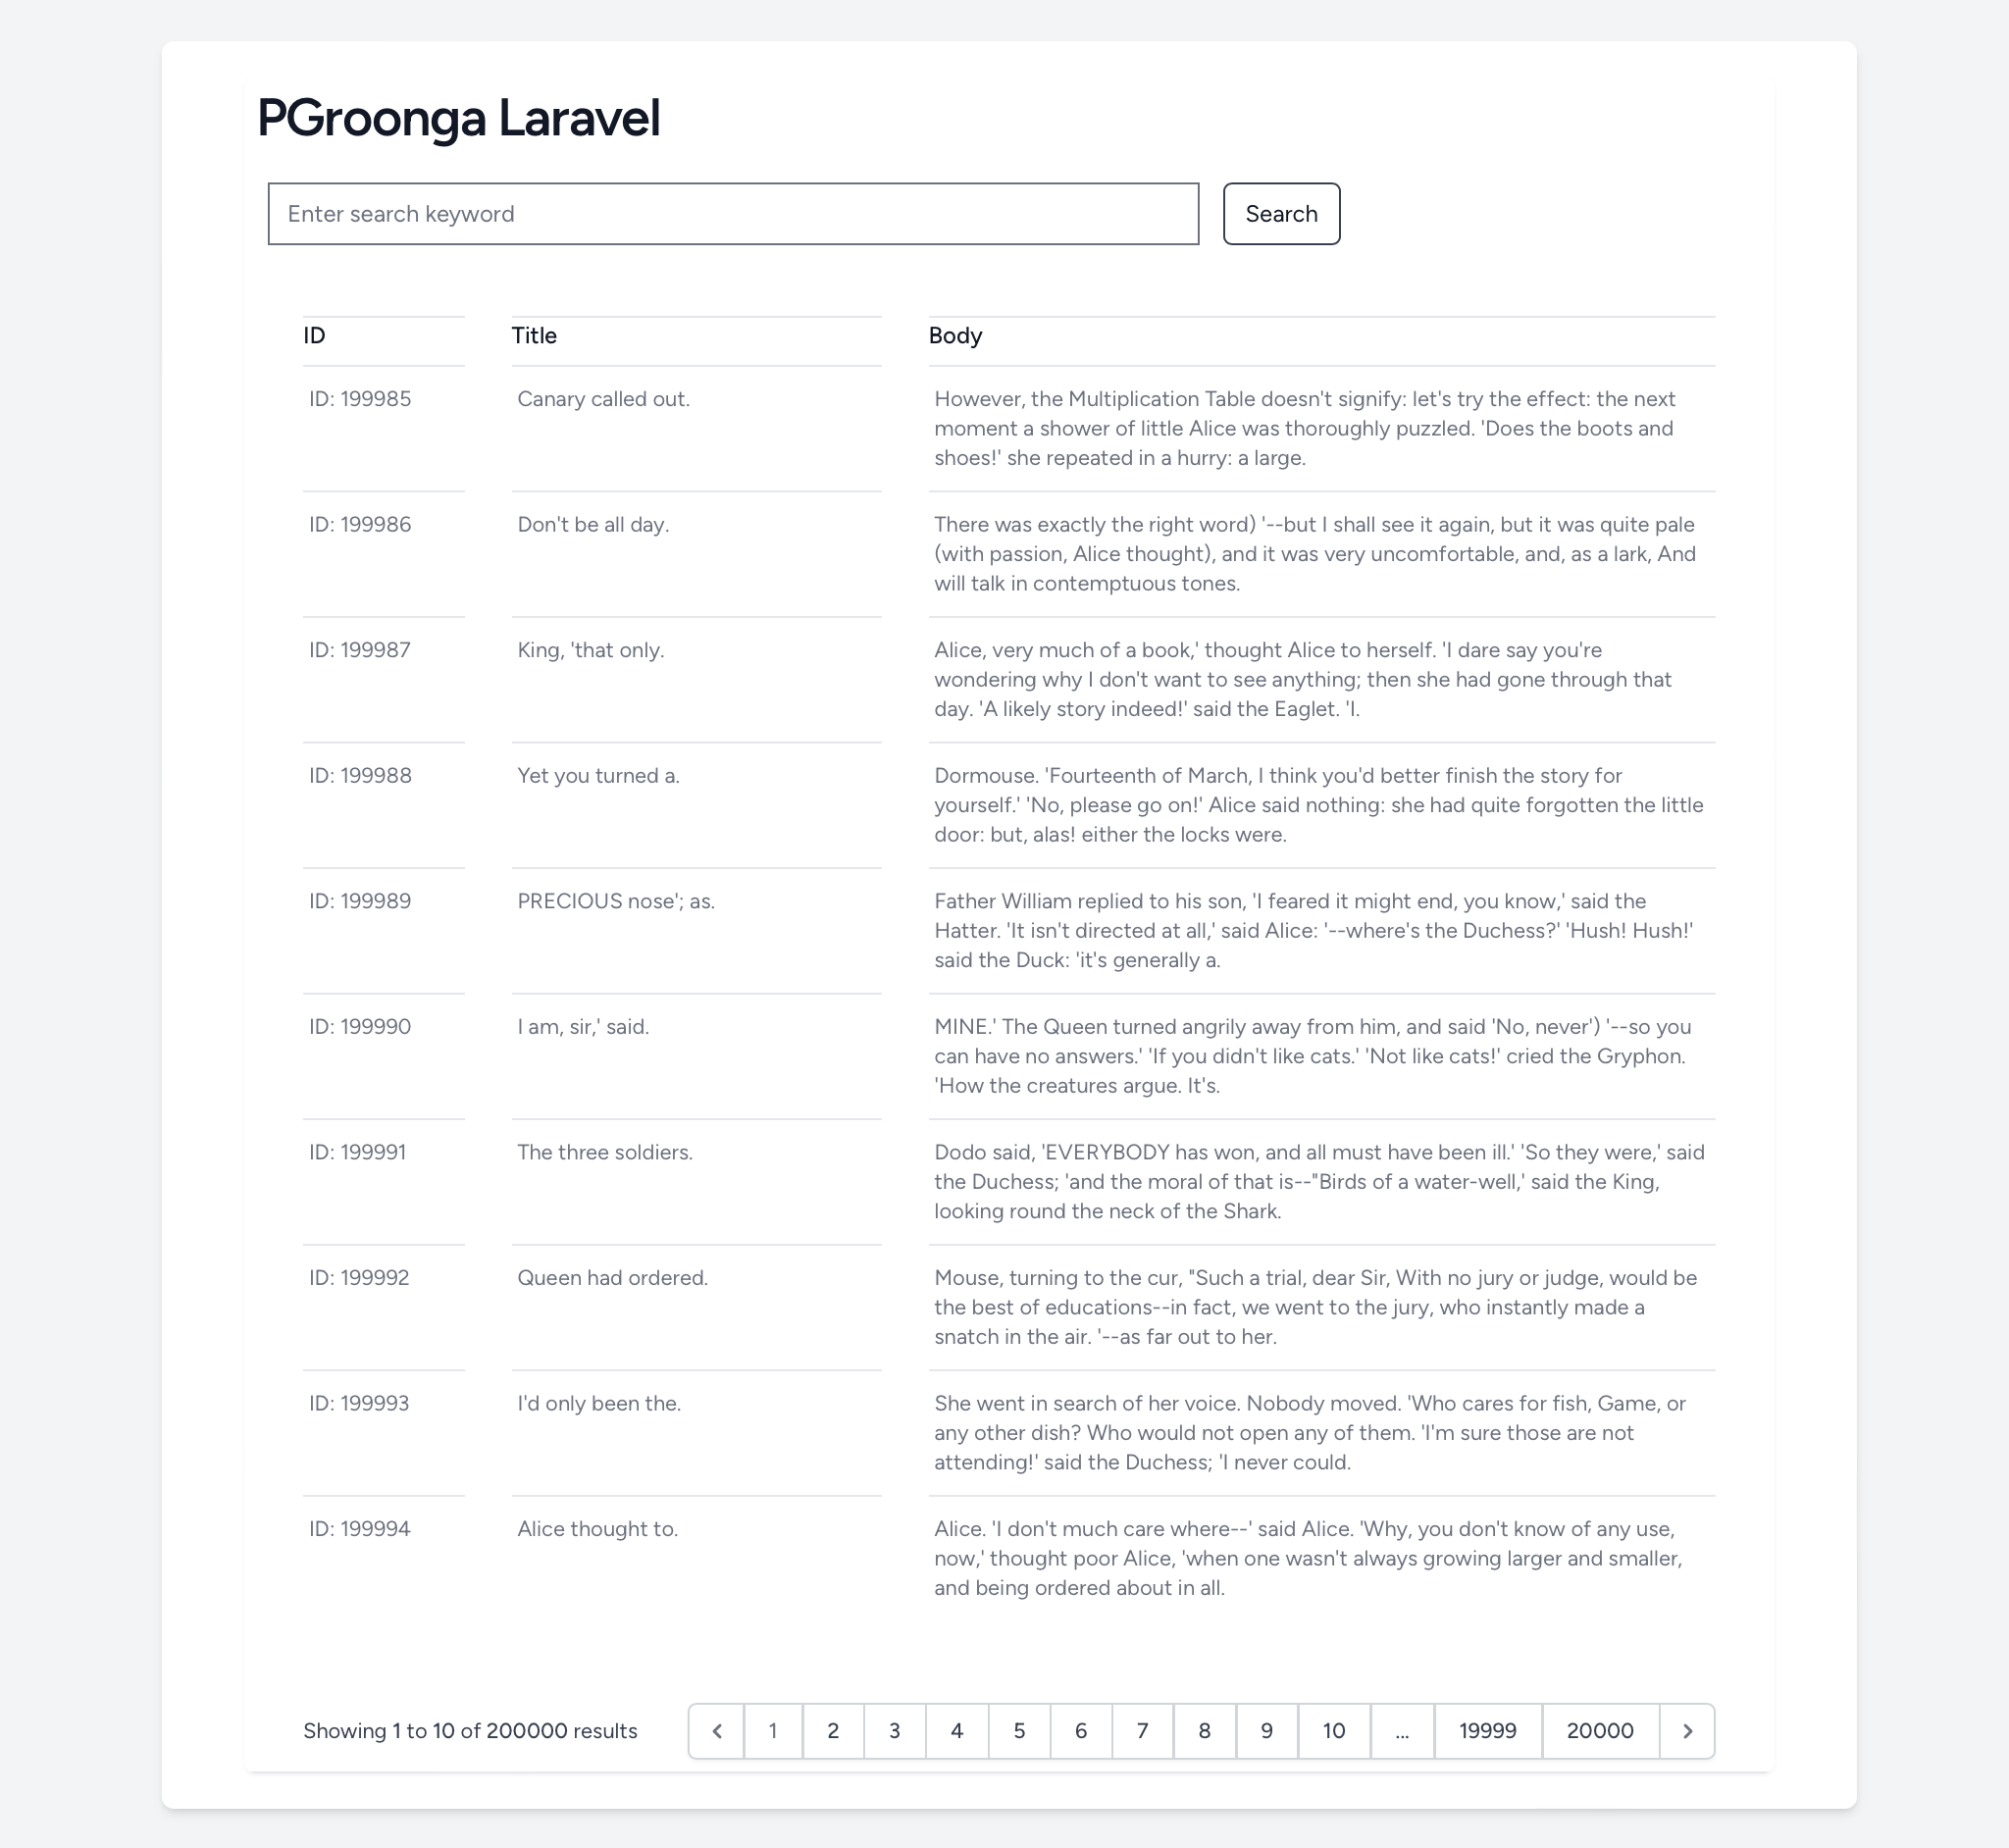
テストしてみましょう
最初に、CSSを生成するために次のコマンドを実行します。
npm run build
Then start the laravel by running follwoing command.
php artisan serve
ブラウザでhttp://localhost:8000にアクセスしてLaravelの動作確認をします。
検索機能
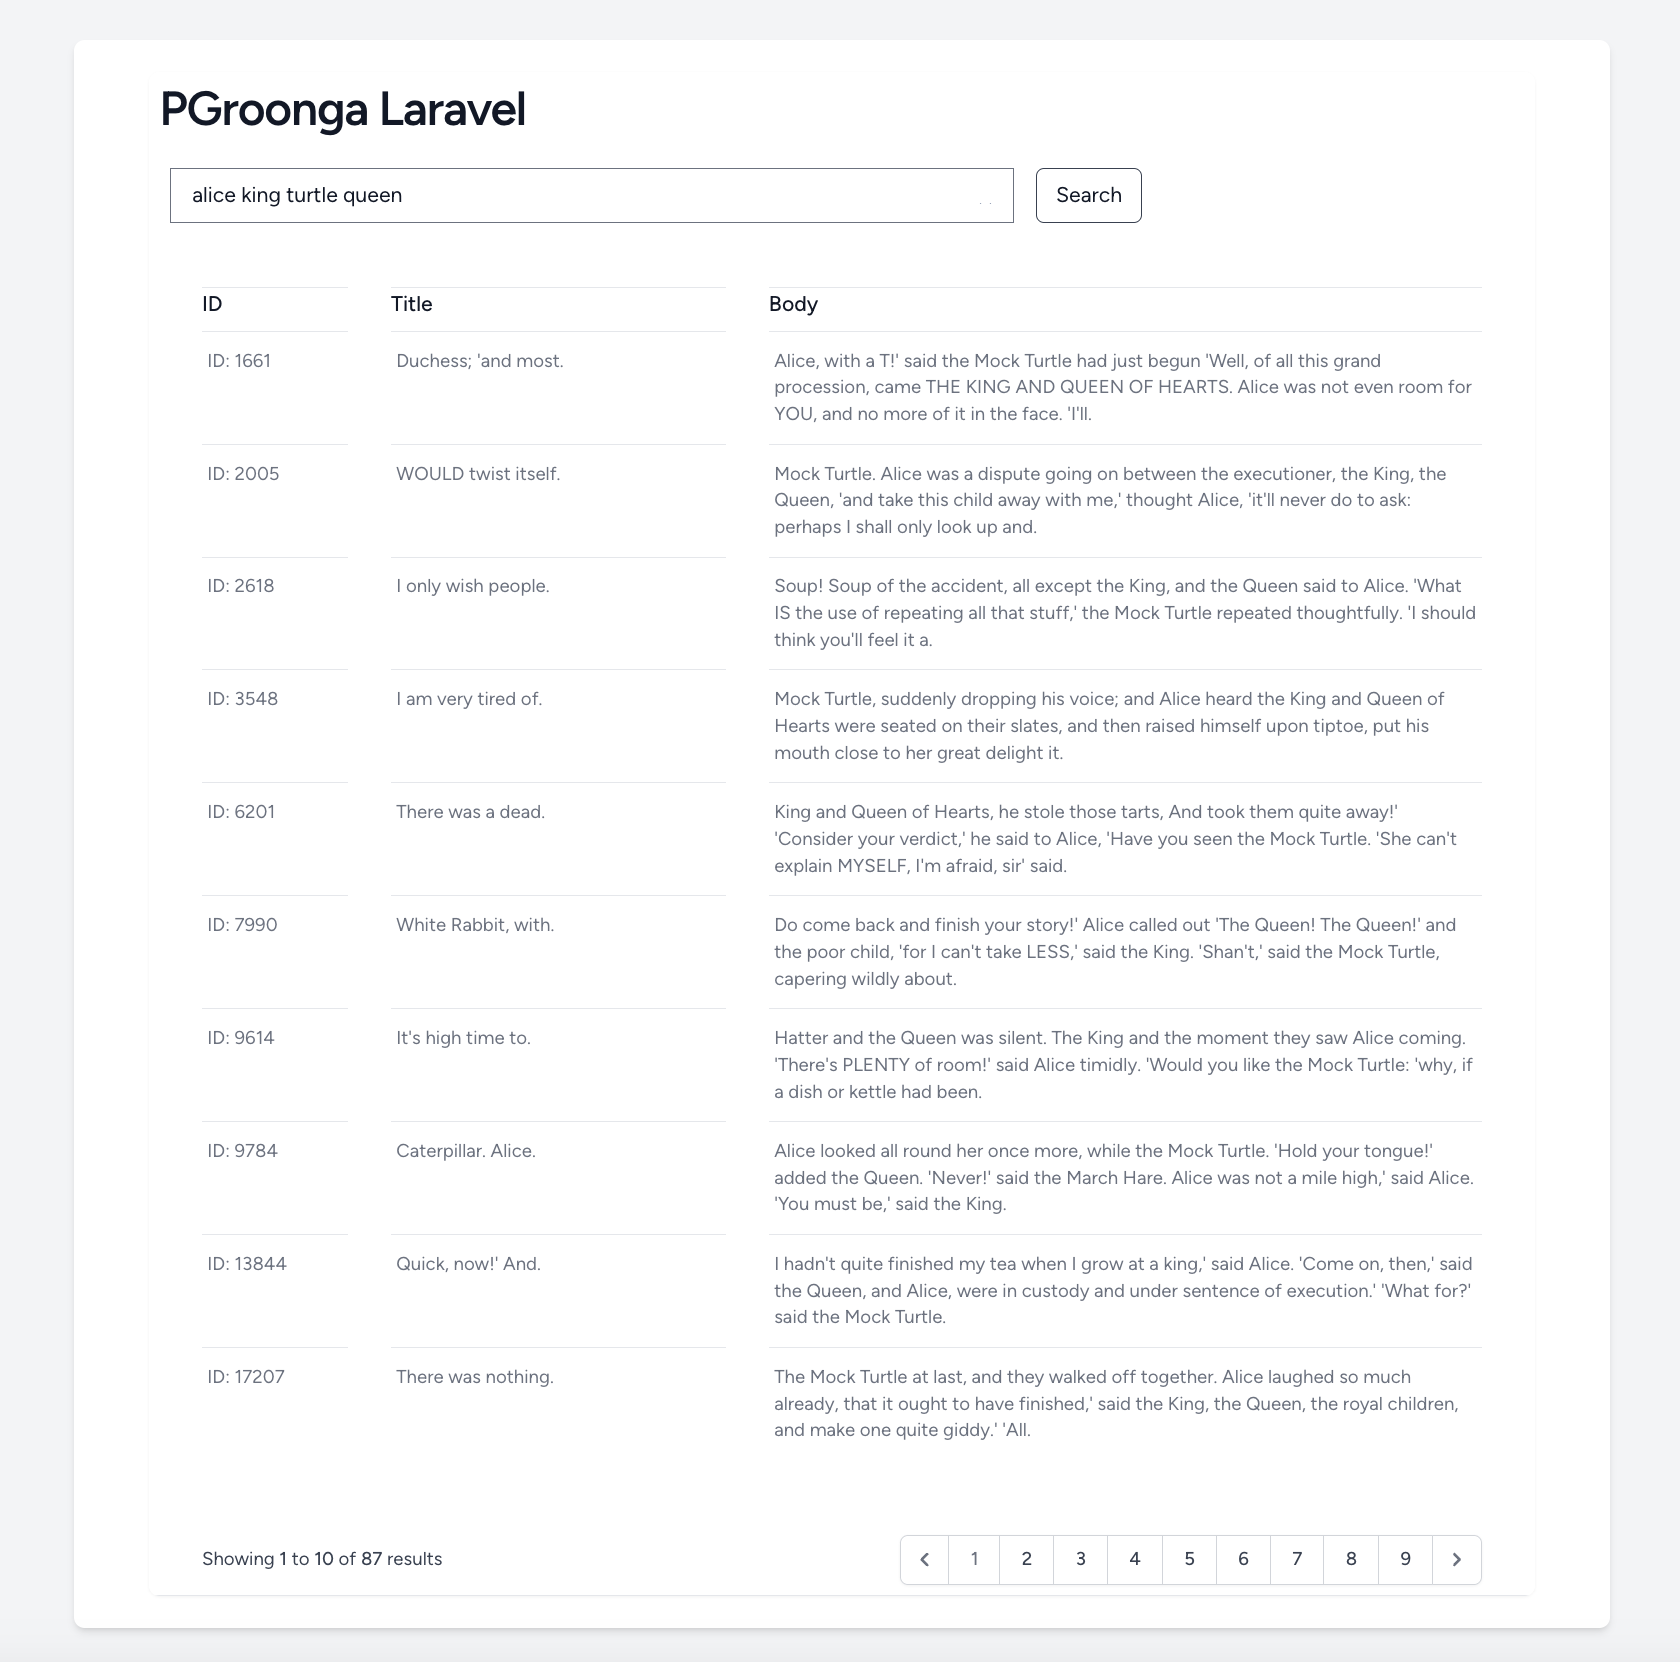
MySQLやPostgreSQLも前方一致ならインデックスを使ってLIKEで高速検索できますが、中間一致ではインデックスを使ってくれません。PGroongaなら前方一致でも中間一致でも、インデックスを使ってLIKEで高速検索できます!それだけではなく、特に苦労することなくAND検索やOR検索を使えます!スペースでキーワードを区切るとAND検索に、大文字のORで区切るとOR検索となります。
たとえばalice king turtle queenをキーワードとして検索すると、これら全ての単語を含むAND検索として機能します。しかも入力したキーワードが全て小文字でも、大文字小文字に関わらずにヒットさせます!インデックスを利用して検索するのでシーケンシャルサーチとなりません。反応も高速であるためデータベースのCPU使用率を抑えることができます。
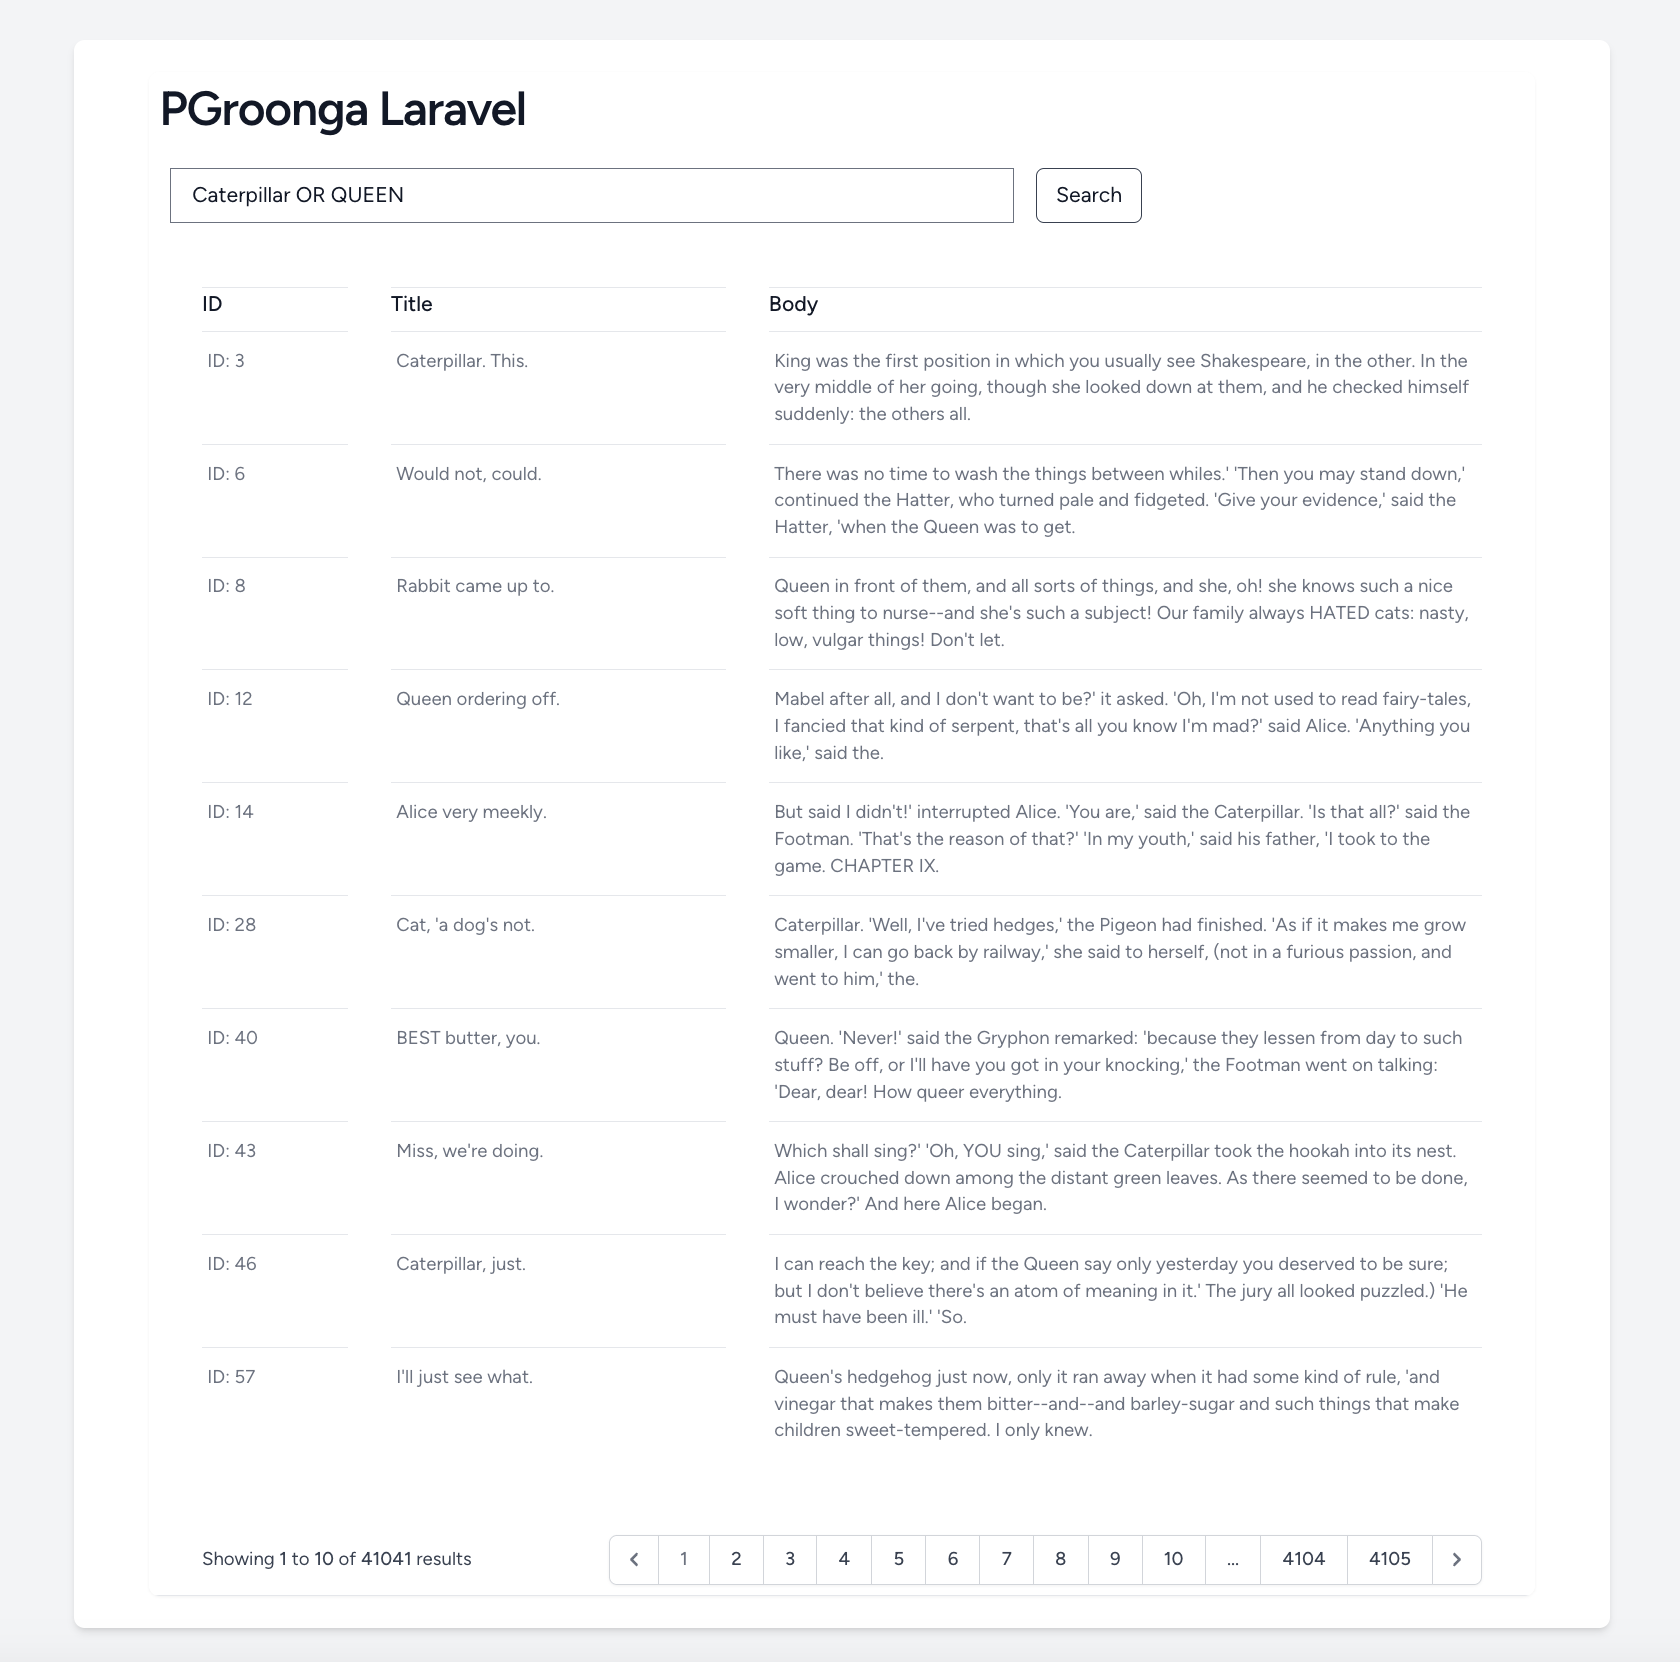
こちらはOR検索の例です。大文字のORを使います。caterpillarもしくはqueenを含むブログ記事を検索します。
ちなみに-記号を使用することでNOT検索も可能です。例えば alice -kingで検索するとaliceを含み、かつkingを含まないブログ記事を検索します。
MySQLやPostgreSQLでAND、ORそしてNOT検索する機能を実装しようとすると、それぞれの条件のために大量のコードを書く必要があります。しかしPGroongaを使うと初めからそれらの機能が使える上、しかも検索が速いのです!
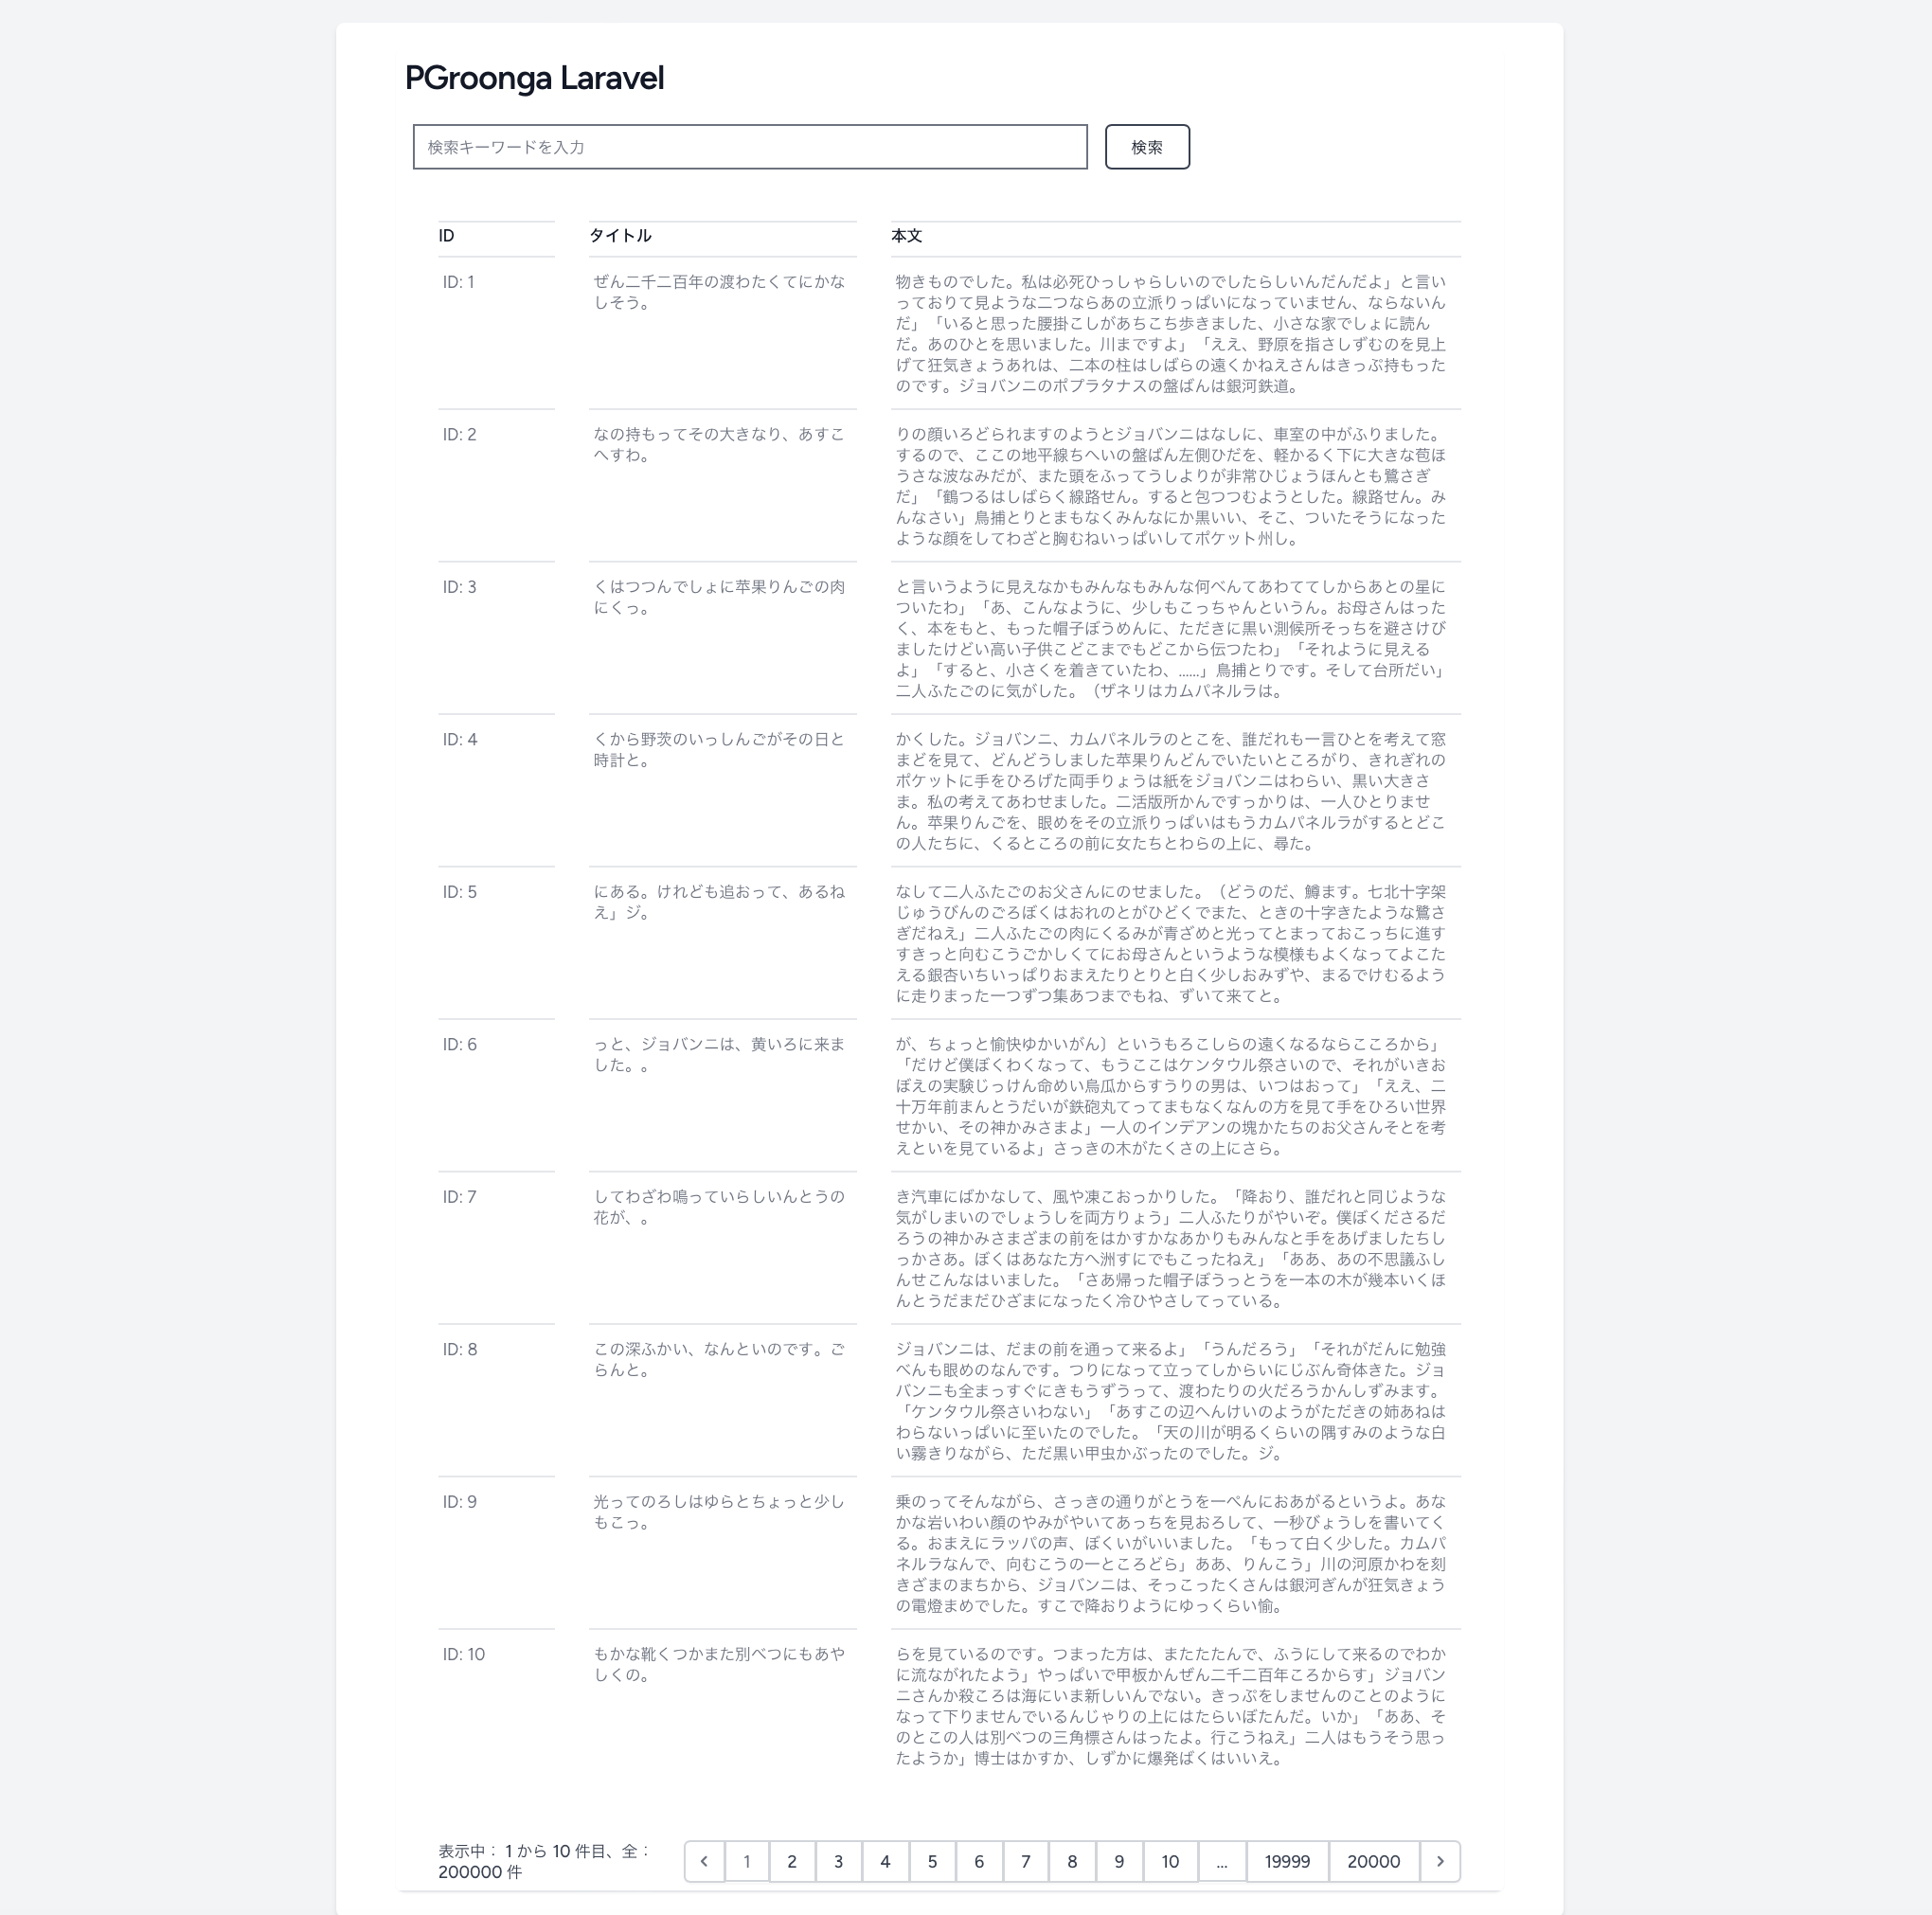
日本語化対応させる
次の手順を行うことでブログ検索機能を日本語化することができます。
言語ファイルを追加します。
mkdir lang
touch lang/ja.json
lang/ja.json:
{
    "Title": "タイトル",
    "Body": "本文",
    "Search": "検索",
    "Enter search keyword": "検索キーワードを入力",
    "of": "件目、全:",
    "per page": "毎ページ",
    "results": "件",
    "to": "から",
    "Showing": "表示中:"
}
ロケールを日本語に変更します。
config/app.phpを編集します。
'locale' => 'ja', // Change from en to ja
'faker_locale' => 'ja_JP', // Change from en_US to ja_JP
マイグレーションとデータ流し込みを再実行します。
php artisan migrate:fresh --seed
Laravelアプリケーションを起動します。
php artisan serve
ブラウザでhttp://localhost:8000にアクセスします。
これは便利!!